

August 3, 2026
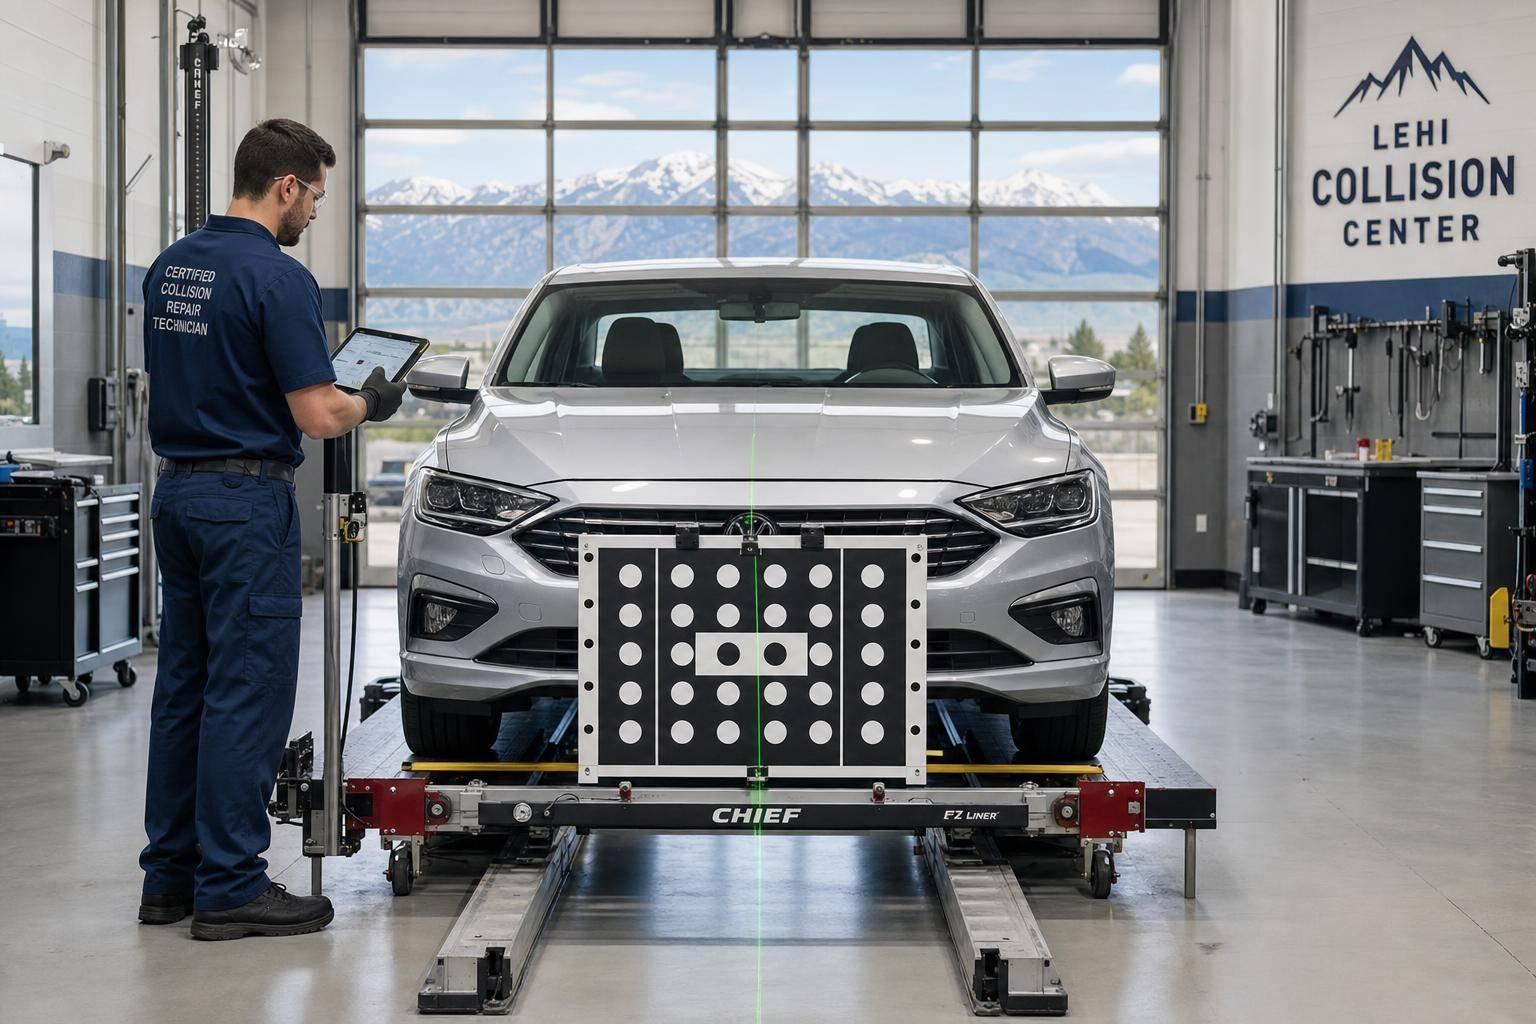
After a crash, I need to do three things fast: document the damage, file the claim, and choose a shop that can return the car to factory specs. That means checking for both visible and hidden damage, reviewing scans and measurements, and making sure the car passes safety checks before pickup.
Here’s the short version:
A few facts stand out. Modern cars often need electronic scans before and after repairs, and even a low-speed hit can affect bumper sensors, alignment, or unibody structure. That’s why a dent or cracked bumper is not always “just cosmetic.”
In plain terms: I’m not just paying to fix how the car looks. I’m making sure it drives straight, protects me in another crash, and has working lights, sensors, and warning systems.
The article below walks through that process from claim filing to final pickup, using simple steps and clear repair terms.
Once everyone is safe and you've contacted the police, your next job is simple: build a clean claim file and pick the right shop before any repair work starts.
Take clear photos of every damaged area from a few angles before anything gets touched. Get wide shots so the full scene makes sense, then close-ups so the damage is easy to see. Also write down the date and time of the crash, your insurance carrier's name, your claim number, and your exact deductible amount. Keep all of it together, both on your phone or computer and in paper form if you can. That small bit of prep can make the claims process a lot less messy.
It also helps to expect the first estimate to change. Why? Because some damage doesn't show up until the shop starts teardown. Once that happens, hidden structural or electronic issues can come to light. When the shop updates the estimate and sends the new amount to the insurance company, that's called a claim supplement. Good records make it easier for the shop to build the estimate and move those supplements through without delays.
Start with I-CAR Gold Class certification, which is the top training credential for collision repair technicians. Then check for OEM certifications from your vehicle's manufacturer. Those show the shop follows brand-specific repair methods and safety rules.
If you drive an RV or motorhome, take an extra minute here. Bigger vehicles need different tools and shop setup, so make sure the shop has experience with that kind of repair.
A shop you can trust should do a few basic things well:
Once you've picked the shop, the vehicle moves into inspection and blueprinting.
The tools a shop uses matter. A lot. They affect how well the vehicle is repaired and whether it gets back to factory standards for safety and fit.
| Tool/System | What It Does |
|---|---|
| Computerized Measuring | Checks frame geometry against factory specs |
| Hydraulic Pulling Equipment | Restores shifted structure |
| Diagnostic Scanning | Finds hidden fault codes |
| ADAS Calibration | Recalibrates driver-assist sensors |
| Computerized Color Matching | Matches factory paint |
These systems help the shop confirm the damage before repair work begins.
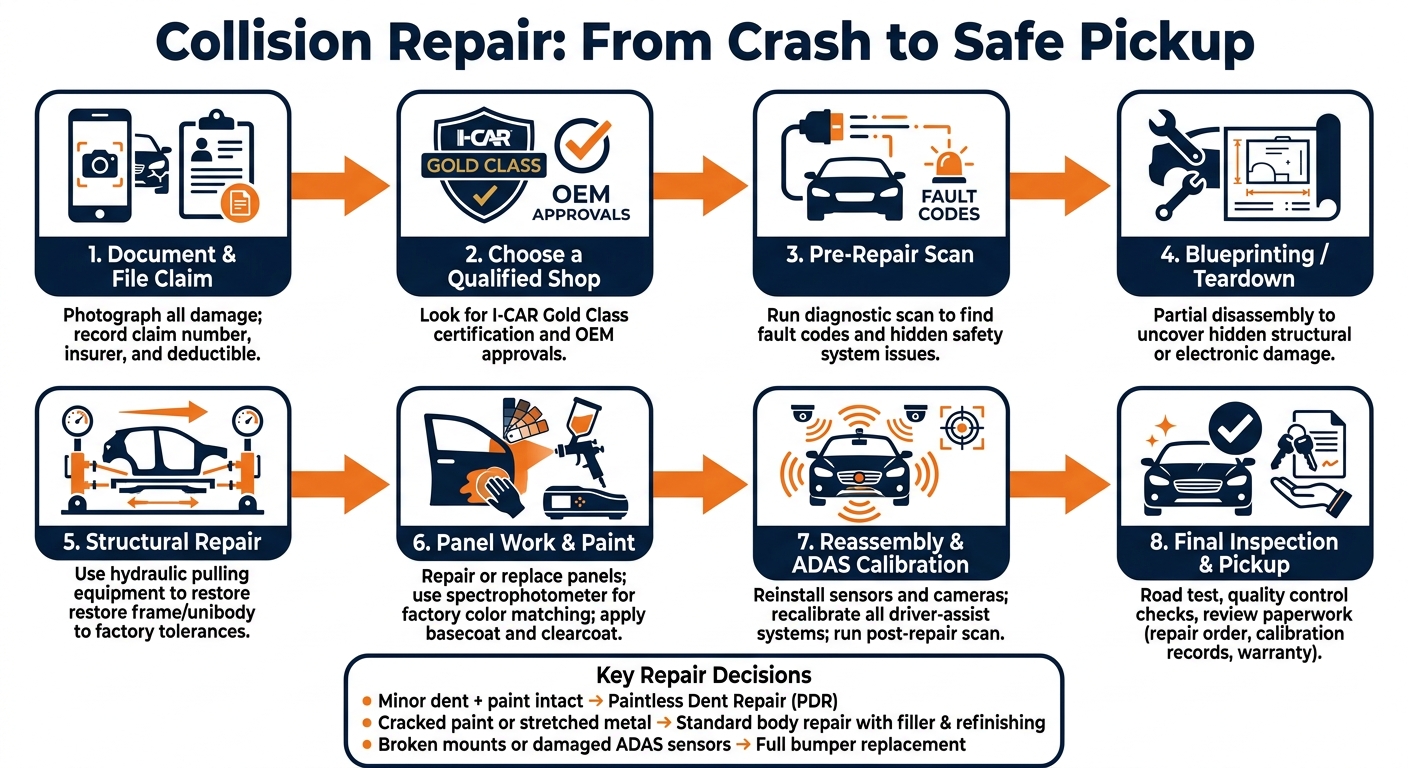
Collision Repair Process: From Crash to Safe Pickup
Once the shop has the vehicle, the estimate turns into a repair plan. From there, the work usually moves through three stages. The goal is simple: turn a damage check into a safe repair that matches factory specs. Skip a step, and it's easy to miss hidden damage or run into delays.
The process starts with a careful inspection. Technicians run a pre-repair scan to check for fault codes and spot safety system issues that don't show up on the outside. They also use computerized or 3D measuring systems to compare the vehicle's current structure with factory specs.
Then comes partial disassembly, often called teardown or blueprinting. This matters because visible damage almost never tells the whole story. Taking parts apart helps the shop find hidden damage and build a detailed repair plan to share with the insurer. On unibody vehicles, even a small hit can affect areas far from the spot that looks damaged.
Good documentation at this stage can also cut down on mid-repair insurance supplements, which often slow things down. That blueprint becomes the roadmap for the rest of the job and helps keep hidden damage from slipping through.
After the repair plan gets approved, technicians move into structural repairs. Hydraulic pulling equipment brings the frame or unibody back to factory tolerances. This part has to follow material-specific repair rules. For example, ultra-high-strength steel can't be heated, and aluminum needs dedicated tools.
Once the structure is back in line, the work shifts to panels and parts. A component isn't repaired or replaced based only on how bad it looks. The decision depends on manufacturer-specific thresholds. Before the vehicle goes to paint, technicians check fit, panel gaps, and mounting points with care.
They also put corrosion protection back in place using:
With the structural work done, the repaired areas are prepped for paint. A spectrophotometer and computerized mixing system are used to match the vehicle's factory color formula. Technicians apply basecoat and clearcoat in controlled conditions to help limit contamination.
Reassembly includes putting sensors and cameras back in place. If the vehicle has ADAS components, those parts are recalibrated after reinstallation. A post-repair scan checks that safety systems are active and that any remaining fault codes are cleared.
After that, the vehicle is road tested, cleaned, and delivered.
Once a vehicle moves from teardown to repair, the focus shifts to how each problem gets fixed. That choice depends on three things: how deep the damage goes, what the panel is made of, and whether the finish is still intact.
Paintless Dent Repair (PDR) is usually the first pick for minor dents, door dings, and hail damage. But it only works when the paint is still intact and the back of the panel can be reached. In that case, technicians use special tools to reshape the panel from behind, which keeps the factory finish in place.
If the paint is cracked, the metal has stretched, or the dent is too deep to work back into shape, then standard body repair is the better route. That process uses filler, sanding, and refinishing. It takes more time, but it can still bring the panel back to its original contour.
A bent frame rail is not a surface issue. It affects alignment and crash protection, so it calls for structural repair instead of cosmetic work.
Bumpers are a little trickier than they look. The outer cover can often be repaired when the damage is limited to light scuffs or small cracks. But if the mounting tabs are broken, the impact absorber is damaged, or the ADAS sensors behind the bumper are affected, the bumper needs to be replaced. A bumper may look fine from the outside and still hide internal damage that leaves safety systems not working.
Shops check scratches, chips, and scuffed clear coat by looking at how far the damage goes. For paint work, they mix paint by formula and blend it into nearby panels so the color match looks smooth.
Repair-versus-replace calls follow OEM limits, not just appearance. Shallow dents may be a fit for PDR. Cracked paint or stretched metal usually points to standard repair. Bumper replacement comes into play when mounts or sensors are damaged. And sometimes a panel that seems repairable still has to be replaced - either because the material falls outside the maker’s repair limits or because labor costs to fix it end up higher than a new OEM part.
Those decisions then move the job into the last round of safety checks before pickup.
After reassembly and calibration, the last step is making sure the vehicle is safe and that the work matches the estimate. Before pickup, technicians check that the repairs line up with factory specs.
At pickup, compare the shop’s checks with your own walk-around and test drive.
| Category | Shop Quality Control Step | Your Pickup Confirmation |
|---|---|---|
| Safety Systems | ADAS calibration and system check | No dashboard warning lights are illuminated after start-up |
| Structural | 3D measuring to factory specs | Panel gaps are even around the hood, doors, and trunk |
| Mechanical | Alignment and wheel balance check | The car drives straight, and the steering wheel is centered |
| Functional | Lights and sensor function testing, plus door and trunk operation checks | All exterior lights, turn signals, doors, and the trunk operate correctly |
| Cosmetic | Paint color and finish inspection | Paint color and texture match in daylight |
| Road Performance | Post-repair road test for handling, noise, and vibration | The vehicle tracks straight, with no noise or vibration |
Here’s one simple tip: step outside the shop and look at the paint in daylight. Lighting inside a repair bay can mask small color or texture mismatches that become easier to spot outdoors.
Before you drive away, collect the paperwork you may need later:
It also helps to keep both digital and paper copies. That gives you a clear repair history if you ever need warranty support or decide to sell the car later.
Collision repair time comes down to one thing: how bad the damage is.
Small fixes may be done in a day. But if your car needs more involved structural or cosmetic work, the job can take several days.
Once the shop completes a full damage assessment, they can give you a clearer timeline. That estimate is based on the repair steps involved and any parts needed to get your vehicle back on the road safely.
Yes, insurance usually covers hidden damage found during teardown.
Here’s how it works: once the collision repair shop starts disassembling the damaged area, they may find more damage that wasn’t visible during the first estimate. When that happens, the shop documents the added damage and sends that information to your insurance company.
This step helps keep the repair scope accurate and fair. It also makes sure needed repairs, including damage found after disassembly, are added to the claim so your vehicle can be safely restored to its pre-accident condition.
Yes, you may need ADAS calibration even after a minor accident. On many modern vehicles, cameras and sensors can shift from even a small impact. And when that happens, those safety systems may no longer point where they should.
That’s why a proper repair process matters. A shop can check whether calibration is needed and confirm that everything works as it should with testing and OEM-equivalent diagnostic equipment.
